Category Archives: programming

drgb camera

I just bought myself an Asus Xtion PRO Live Depth+RGB camera which I plan to use for robotics experiments. It uses the same technology from PrimeSense for depth as Microsoft Kinect but is about half the size, can be powered solely over USB and weighs around 170g which makes it a better match for robotics.

asus xtion pro live vs. matchbox

xtion_pro_on_wild_thumper_20111221_003

Here are my notes on getting the basic Openni / NITE demos running on ubuntu 11.10:

sudo apt-get install build-essential libusb-1.0-0-dev freeglut3-dev

install openni

mkdir openni
cd openni
git clone https://github.com/OpenNI/OpenNI.git
cd Platform/Linux-x86/CreateRedist
./RedistMaker
cd ../Redist/
sudo ./install.sh

install sensor

git clone https://github.com/PrimeSense/Sensor.git
cd Sensor/Platform/Linux-x86/CreateRedist/
./RedistMaker
cd ../Redist
sudo ./install.sh

install primesense NITE. This seems to be closed source but free of charge
download from http://www.openni.org/Downloads/OpenNIModules.aspx under Middleware binaries. In my case it looks like this:

tar -xf nite-bin-linux64-v1.4.2.3.tar
sudo ./install.sh

this will prompt you for a key, which is: 0KOIk2JeIBYClPWVnMoRKn5cdY4=

then go to directory containing NITE samples and try out some demo apps for example Sample-Players:

cd Samples/Bin/Release
./Sample-Players

This is how SamplePlayers looks when it has identified me in the picture:
openni nite SamplePlayers demo

SVG fun

I have lately been interested in vector graphics in general and SVG in particular. My hope is that it would potentially allow us to do web design in a far saner way than using about 6 images for each box that requires rounded corners and some gradients. The result would also be nicely scalable to different resolutions and probably take far less bandwidth to serve since the aforementioned box would probably just be represented by a couple of hundred bytes of XML in the SVG file and this can be packed to take even less space. As an added bonus you can also get reasonable diffs from the revision control for your SVGs.

Anyway here’s a simple SVG analog clock widget, a kind of Hello world if you will.
The idea was to write a clock widget that can be easily redesigned by non-programmers with a WYSIWYG SVG editor like Inkscape.

Here are a couple of examples that should be visible in all the reasonable browsers (ie. not IE) that have been released since 2002 or so:

Basically you can take either of these files and clock.js from the same directory and edit the SVG file in Inkscape and it should still work.
There are couple of things you have to keep in mind while editing though:

  • There should be clock hands with the ID’s second_hand,minute_hand and hour_hand
  • There should be a circle with the ID clockface which is used to determine the center of rotation.
  • The IDs of objects can be changed from the Object properties dialog
  • You should probably use the align tool to place the clock hands vertically to the center of the clockface element, otherwise the clock will act funny
  • The clockface doesn’t have to be visible, the code only needs it to know the center of rotation. So you can make it invisible if you want to create non-circular clockfaces

This kind of simple things can actually be done without any ECMAScript whatsoever using only SVG SMIL animation. I haven’t really investigated SMIL yet though.

house sensor network

Lately I have spent some time with a friend on building a temperature sensor network for my house. We used CAT5 cables for the wiring and DS18B20+ digital temperature sensors (~2.4€ a piece).

The network runs in two branches and is powered directly from the serial port so the sensors run on the phantom power.
The serial port connector is based on a schematic from this article (in Estonian). It’s actually connected to a serial-to-USB converter which is plugged into the powered USB hub which in turn is plugged into the Beagleboard. I use the digitemp utility to read the sensors.

Since we used CAT5 cables there are still 6 wires left that can be used if we need to transmit external power for higher power actuators and/or sensors in the future.

The connection points to the one-wire network are done with RJ45 surface wall mount boxes.
Here’s a picture of one splitter box for sensor connections and one sensor embedded directly into the box:

sensor_connection_small

Here’s what the sensor cables look like:
sensor_small

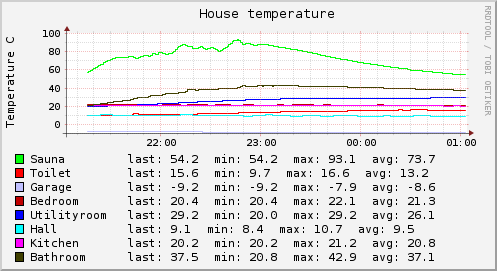
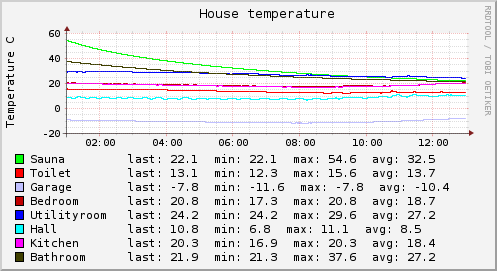
And finally here are a couple of graphs from last night:

house_temp_short

house_temp_long

Live data is available @ pachube.

sharpening the saw

A friend of mine called the other day and asked how to basically loop over a tree. The actual description of the problem was that there’s an SQL table with N fields that has a different enum defined for each field.
His question was how to print out all the possible records for such a table.

While it’s a simple task there are many ways to do it with different upsides and downsides. So I decided to code up several implementations to show him the possibilities.

So the data structure is something along the lines of:

table = (
  ('a', ('a1','a2')),
  ('b', ('b1', 'b2', 'b3')),
  ('c', ('c1', 'c2', 'c3')),
  ('d', ('d1', 'd2')),
)

The first solution that comes to mind is obviously the simple recursive algorithm:

def construct_tree(t, depth=0):
    if depth == len(t)-1:
        return [[x] for x in t[depth][1]]
 
    retl = []
    futures = construct_tree(t, depth+1)
    for attr_val in t[depth][1]:
        for f in futures:
            retl.append([attr_val] + f)
 
    return retl
 
print ','.join(f[0] for f in table)
for l in construct_tree(table):
    print ','.join(l)

This works and is easy to understand but consumes lots of memory since it will build full tree as list of lists before returning.

Another solution is to avoid recursion completely and use a separate list to keep track of where you are in the tree.

def construct_path(idx_map, t):
    """return path through the tree as a iterable"""
    return (t[fieldno][1][field_val_idx] for fieldno, field_val_idx in enumerate(idx_map))
 
def reset_subtree(from_idx, idx_map, t):
    for idx in range(from_idx+1, len(t)):
        idx_map[idx] = 0
 
def construct_tree(t):
    idx_map = [0]*len(t)
    cur_field = len(t)-1
 
    while 1:
        if cur_field == len(t)-1:
            # we have reached the leaf node, print the whole path
            yield construct_path(idx_map, t)
 
        if idx_map[cur_field] < len(t[cur_field][1])-1:
            # we still have some work at this depth
            idx_map[cur_field] += 1
            # always jump to the end after changing index
            cur_field = len(t)-1
        else:
            # can't increment this field anymore, try previous if any
            cur_field -= 1
            if cur_field >= 0:
                reset_subtree(cur_field, idx_map, t)
            else:
                # there is no previous field
                break
 
print ','.join(f[0] for f in table)
for l in construct_tree(table):
    print ','.join(l)

Performance wise this is a lot better but certainly harder to write and understand.

So how to get the performance of the iterative solution while keeping the simplicity of the recursive one? The solution is to use Python’s generators instead of lists:

import collections
 
def construct_tree(t, buf=None):
    if buf is None:
        buf = collections.deque()
 
    for x in t[len(buf)][1]:
        buf.append(x)
        if len(buf) == len(t):
            # leaf node, stop recursion
            yield buf
        else:
            for x in construct_tree(t, buf):
                yield x
        buf.pop()
 
print ','.join(f[0] for f in table)
for e in construct_tree(table):
    print ','.join(e)

Since I have lately been re-learning Prolog I also wanted to write a solution in that language since this seems to be an ideal task for it:

attribute(a, [a1, a2]).
attribute(b, [b1, b2, b3]).
attribute(c, [c1, c2, c3]).
attribute(d, [d1, d2]).
 
fgen(Field, X):-
    attribute(Field, L1),
    member(X, L1).
 
table:-
    fgen(a, X), fgen(b, Y), fgen(c, Z), fgen(d, I),
    write(X),write(','),write(Y),write(','),write(Z),write(','),write(I),nl,fail.

And here’s how to run it:

hadara@hadara-laptop:~/code$ prolog -s table.pl -t table -q | head -3
a1,b1,c1,d1
a1,b1,c1,d2
a1,b1,c2,d1

Update
While learning Erlang I noticed that their list comprehension syntax allowed you to use multiple generator expressions in it. You can think of it as basically using nested loops so you can write my specific example in Erlang like this:

[{X1, X2, X3, X4} || X1 <- [a1,a2], X2 <- [b1,b2,b3], X3 <- [c1,c2,c3], X4 <- [d1,d2]].

Sure enough Pythons list comprehension syntax allows the same:

[(x1,x2,x3,x4) for x1 in ('a1','a2') for x2 in ('b1','b2','b3') for x3 in ('c1','c2','c3') for x4 in ('d1','d2')]

or in a much more effective way using the generator expressions:

((x1,x2,x3,x4) for x1 in ('a1','a2') for x2 in ('b1','b2','b3') for x3 in ('c1','c2','c3') for x4 in ('d1','d2'))

This of course would be useless in real life since you obviously do not want to hard code expression for specific size of list. Luckily you can just use recursion inside the comprehension expression to generalize it.
In Erlang it would look like this:

build_tree([Head]) -> [[X] || X <- Head];
build_tree([Head|Tail]) ->
    [[X1] ++ X2 || X1 <- Head, X2 <- build_tree(Tail)].

and in Python (using generators instead of list comprehensions):

def construct_tree(x):
    if len(x) == 1:
        return ([i] for i in x[0])
 
    return ([i] + j for i in x[0] for j in construct_tree(x[1:]))

some fixes for the nginx push module

I have been testing various Comet/Push servers lately and finally decided to use Nginx Push module. My use case is a bit extraordinary as far as Comet applications go – I need to have ~150k TCP connections open 24/7, but there’s no need for broadcasting or message queuing functionality.

I found 2 memory leaks in the Nginx Push module ver. 0.692.

The first one occurs when you send a message to a channel that doesn’t have any listeners. Here’s a patch I wrote for that. I have only tested this with the push_subscriber_concurrency first and push_store_messages off scenario, it might very well break other scenarios.

The other far more annoying memory leak occured for every message that I sent and was rather large (message length + ~200 hundred bytes). So it was leaking about 27 MB for 100k “hello world!” type test messages.

I spent several days hunting this one down and finally it occured to me that the nginx pool allocator that the module used through ngx_(p|c)alloc() and ngx_pfree() functions wasn’t really built to free memory in the general case. Unless you allocations were larger than some defined threshhold (4k) they were done from a memory block that didn’t have any means in the data structure for actually freeing these allocations (it only keeps the max alloced pointer).
So if the small allocation area ran out of memory it was just increased.

Larger allocations were kept in a different allocation block list and were actually free’d on ngx_pfree().

Here’s the actual source of the ngx_pfree()

ngx_int_t
ngx_pfree(ngx_pool_t *pool, void *p)
{
    ngx_pool_large_t  *l;
 
    for (l = pool->large; l; l = l->next) {
        if (p == l->alloc) {
            ngx_log_debug1(NGX_LOG_DEBUG_ALLOC, pool->log, 0,
                           "free: %p", l->alloc);
            ngx_free(l->alloc);
            l->alloc = NULL;
 
            return NGX_OK;
        }
    }
 
    return NGX_DECLINED;
}

This allocator is designed that way to be as efficient as possible for allocating memory for requests that generally have a short life time. For that particular use case not freeing small amounts of memory is mostly OK and because of the simpler data structure also more effective. All the memory blocks were free’d anyway then the request was done and ngx_destroy_pool() was called.

The Push module used this pool allocator in a different way – the pool was created on bootup and it was never destroyed so it just grew and grew even though free was called correctly.

So anyway, here’s a second patch that fixes this memory leak by replacing nginx pool allocator usage with actual system allocator. I have tested this with 200k TCP connections with 100M messages and the memory usage hasn’t changed at all.

I also found a segmentation fault when using push_subscriber_concurrency last. This is probably some kind of concurrency/locking issue since this setting causes internal broadcasting under some conditions. I haven’t spent any time hunting that bug since I really needed push_subscriber_concurrency first. Besides the author of the module said that bug was known and someone was already working on that.